Hello Crafty Friends – I am here with a slimline Thanks card using a some
products from Clear Scrap. I used the Rose Chipboard Embellishment and the Brick Wall 4×6 Stencil

Supplies Used:
Artist Lost: Coarse Texture Paste
Brutus Monroe: Chroma Mist -Bluebell
Brutus Monroe: Evergreen Embossing Powder
Imagine Crafts: MBoss Valentine Embosing Powder
Recollections Brand 110lb White & Gray Cardstock
Shimmer Cardstock: Gray
VersaMark Ink
Thanks Die
Slimline Dies
Tiny Red Gems
Bearly Art Glue
Tools:
Heat Tool
Craft Spatula
Masking Tape
Paper Towels


Step1. - I start by placing the Brick Wall 4×6 Stencil onto the white cardstock I had die cut for my card front. I used a bit of masking tape to hold the stencil in place. I then use a craft spatula to smooth on the texture paste through the stencil. I then remove the stencil and clean it.


Whilke the paste is still wet I do a light spraying of the Chroma Mist(crafy spray) onto the panel. I set it aside to dry (about 20 minutes).


Step 2. – Next, I put some masking tape onto the Rose Chipboard Embellishment stem and leaf. Then, I press the VersaMark ink ontot he Rose bud. I cover the bud with the Red embosssing powder and heat set it. I then repeat the process only this time I cover the bud and cover the stem and leaf with the Green embossing powder and heat set it.


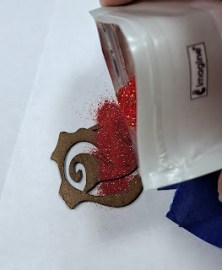


Step 3. I die cut the senitment 4times. 1 Time from the Shimmer Gray cardstock, 2 times from the gray cardstock and 1 time from white cardstock.

I adhere the three gray senitments together. I cut the N from the white sentiment and then adhere it to the back of the gray one. I did this so the sentiment would lay flat on the rose stem.


Step 4. Now, let put the card together. I cut 2 panels of gray cardstock using my slimline die and another white cardstock with the smaller slimline die (same one I used for the scard front).

Adhere the white panels onto the gray panels. Then, I scored the top of the back panel about half inch from the top. I put some adhesive onto the section and pressed the top layer of the card onto it. The card is now made.


I then adhered the Rose and sentiement ontot the card front. For a finishing touch I adhered a few tiny red gems to the card front.


Our card is complete.

Thank you for stopping by the blog today. I hope you found some inspiration!
I hope you give one of our amazing Chipboard Embellishments and Stencils a try!
Follow us for more inspiration on social media:


 Clear Scraps Project Post
Leave a comment